

How To Draw A Flowchart In Word
A diagram is worth a thousand words, especially if you're trying to explain a process. And if you know how to make a flowchart in Word, you don't need a unlike diagram-creation tool. Y'all tin can make the flowchart correct inside Microsoft Word, no programming or design skills required.


A flowchart is a graphical representation of a series of steps or deportment. It'southward most constructive for depicting a procedure, data flow, workflow, or decision steps. In a flowchart, each shape holds a pregnant. The most bones ones are:
- Oval (or pill shape). Offset or end of the procedure.
- Rectangle. Action or sub-process.
- Diamond. Decision point.
- Parallelogram. Either an input needed for the process, or an output that goes into the next stride.
Other shapes are used in flowcharts for very specific applications like data flow diagrams. Merely the above bones flowchart symbols should exist enough for the most common charts. Whether you demand merely the basics or specialized shapes, you can find them in Word.
In this tutorial, I walk you stride-by-step through how to make a flowchart in Microsoft Word using basic shapes. Word offers ii ways to create a flowchart. Apply the method that lets you lot make the flowchart you envision.
Note: For this tutorial, I used Microsoft Word for Mac version sixteen. If yous're using a different version of the awarding, the interface and steps may exist different.
Method 1: Create a Flowchart in Give-and-take With Shapes
The first way to create a flowchart in Word is by inserting shapes in your certificate. Hither'southward what to do:
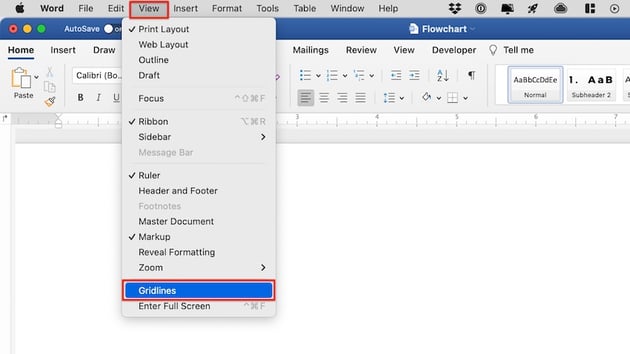
1. Display Gridlines
Earlier getting started, make sure to switch on gridlines. This will go far much easier for yous to create a nice-looking flowchart. Aside from showing you guide lines, when gridlines are on, shapes and lines snap to regular spaces, making information technology like shooting fish in a barrel to marshal elements.
To switch on the gridlines, go to View > Gridlines.


two. Create the Flowchart Shapes
At present you're set to start inserting shapes. Get to Insert > Shapes. The shapes carte du jour appears. Scroll down to the Flowchart shapes. If you hover over whatsoever shape, a tip-tool appears, letting you know what the shape means. Click on the shape you wish to use.
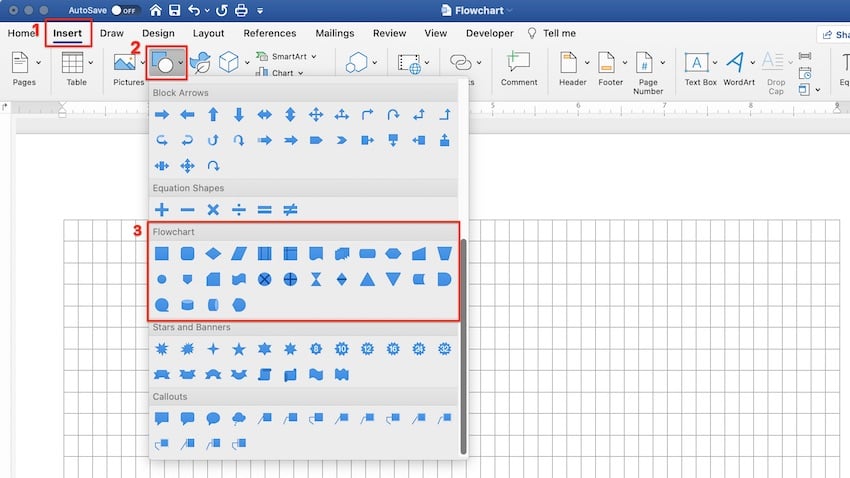


The cursor turns into a crosshair. Click and drag the crosshair to create the shape to the size yous desire.


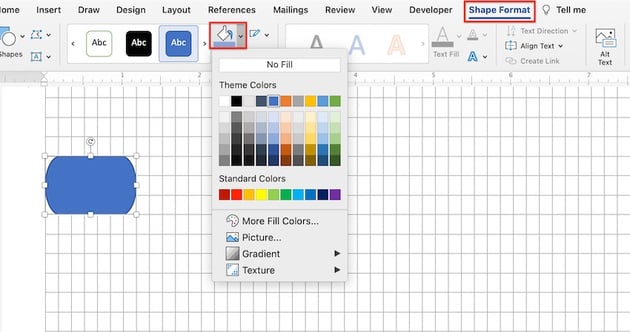
3. Format the Flowchart Shapes
Use the options on the Shape Format ribbon to format the shape'due south fill color, edge, and other attributes.


4. Add text within the flowchart shapes.
To add text inside a flowchart shape, first select the shape. Then, kickoff typing. The text volition appear inside the selected shape.


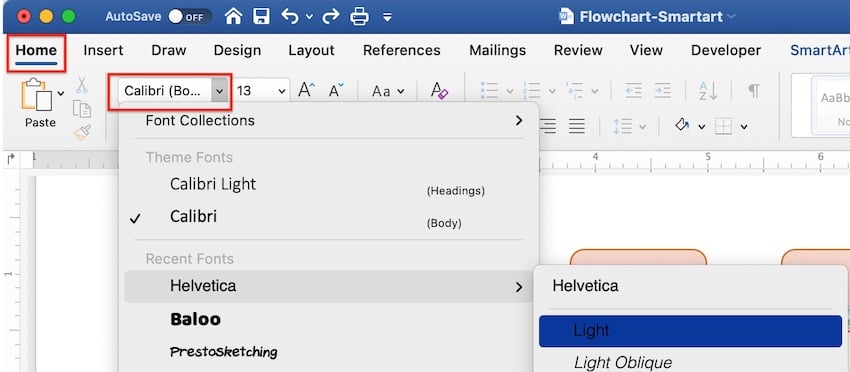
5. Format the Text
If y'all wish to format the text inside a shape, select the shape. Under the Home tab, apply the formatting options to select the font, font size, and other attributes.


Repeat the previous steps to create all the shapes yous need for your flowchart. Apply the gridlines to arrange them on your document.


half-dozen. Add the Flowchart Connectors
Adjacent, you're going to want to connect the shapes with lines or arrows.
To insert an pointer, go to Insert > Lines. The lines menu opens. Click on the line you wish to use.


Under the Shape Format tab, use the options to format the connector.
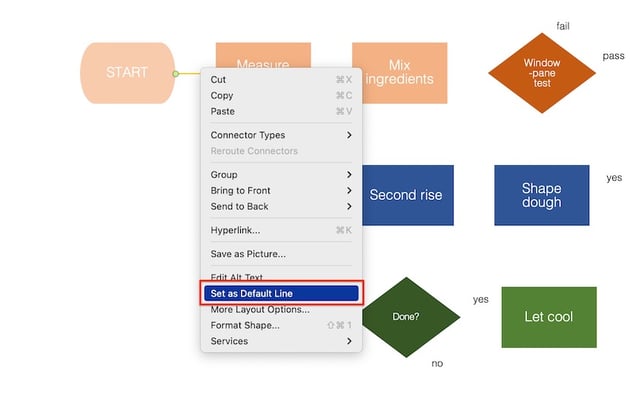
When the line is formatted as y'all similar, set up it as a default line. That way Word volition use the same formatting settings for the next lines you create, and you won't have to go along formatting each one.
To set a line as the default line, right-click on it, so select Gear up as Default Line.


Repeat until you lot've inserted, formatted, and arranged all the connectors you lot need.
4. Insert More Text
You may discover that you need text outside of the shapes in your flowchart.
To add text, go to Insert > Text Box. Click and drag the cursor where y'all wish to place the text box. Type the text inside the box.


Adjacent, format the text. With the text box selected, click on the Home tab. Utilise the formatting options on the ribbon to format the text.


When your flowchart is complete, switch off the Gridlines, and enjoy your cosmos!


Method Two: Create a Flowchart in Word With SmartArt
Another way to create flowcharts in MS Word is past using SmartArt. It'southward a pre-designed visual template in Word that lets you apace make charts and diagrams. You tin format SmartArt—upward to a certain extent—and personalize them with your ain data.
To create a Microsoft SmartArt flowchart, follow these steps:
1. Insert a New SmartArt
Become to Insert > SmartArt > Process. The Process menu pops up.


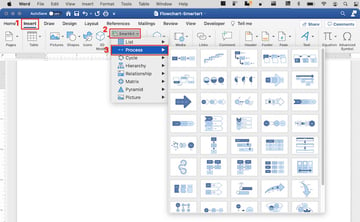
Choose the SmartArt that's about suitable for the flowchart you wish to create and click on it.
two. Format the SmartArt Flowchart
Under the SmartArt Design tab, use the tools on the ribbon to format the various elements of the SmartArt.
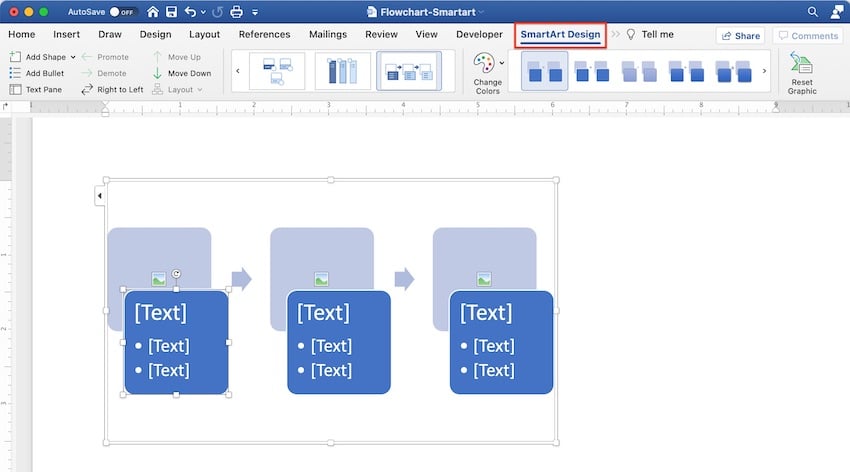


Explore the special effects menu to run into ways you can spice up your chart.

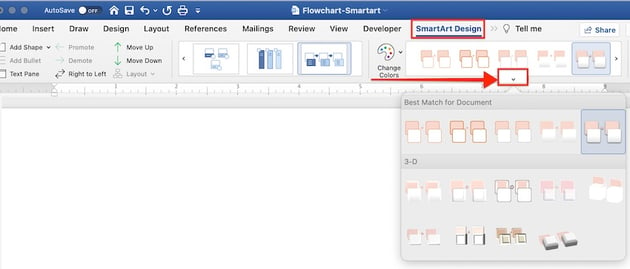

At any point, yous tin also alter the fashion of your Microsoft SmartArt flowchart. Start, select the SmartArt. Under the SmartArt Design tab, open the styles menu. Click on a unlike way y'all wish to apply.


3. Add together Steps
Y'all'll probably need to add steps to your process SmartArt. To practice this, make sure you're on the SmartArt Design tab. Click on the Add Shape dropdown menu and choose from one of two options:
- Add Shape After. Adds a stride at the end of the electric current SmartArt.
- Add Shape Before. Adds a footstep at the outset.


Tip: You can add together steps at any bespeak in your workflow. Just I propose you add all the steps you think y'all'll demand before you lot add your text.
4. Add Your Text
To add your text, click on a text box—it'll have a placeholder that says "Text"—and type your own text. Under the SmartArt Design tab, you tin likewise click on the Text Pane button to add and edit text through the Text Pane.


You can also format the text within the SmartArt. First, select the text box, and so click on the Home tab. Utilise the formatting options to modify the font, font size, and etc.


5. Add together Images
If the SmartArt flowchart style you created includes pictures, at present'southward the time to add your custom images.
Click on the image icon. This launches your document finder. Click on the image file you want to add, then click Insert.

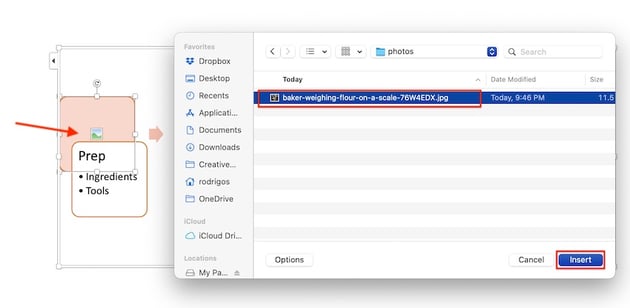

Tip: Make certain your image has the right proportions for the paradigm placeholder in the SmartArt. If the placeholder is square, edit your image to be a square before inserting information technology. Otherwise, it may get cropped awkwardly.
Repeat the steps to a higher place to complete your Microsoft SmartArt flowchart.


Shapes vs. SmartArt: What'due south the Best Way to Create a Flowchart in Word?
At present that know how to create a flowchart in Word using ii methods, you may be wondering, which is the better way: shapes or SmartArt?
Each has its advantages and disadvantages.
Employ shapes to create a flowchart if:
-
You lot want complete control over how your flowchart looks. It'due south simply easier to control the different elements of a flowchart that's built from scratch using shapes and lines or arrows as connectors.
-
You want to employ symbolic flowchart shapes. Word shapes include both the bones shapes and special flowchart shapes.
-
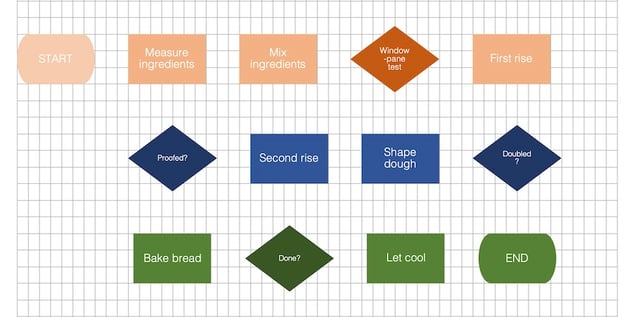
Y'all've got a complicated flowchart. If you're trying to create a flowchart with split steps (like the bread making flowchart I made with charts), so yous're better off using shapes.
Consider using SmartArt to make a flowchart if:
-
You want a creatively designed chart chop-chop. SmartArt process diagrams are pre-made past designers to look great with minimal fuss.
-
Yous don't need traditional flowchart shapes. Almost Microsoft SmartArt flowcharts apply just basic shapes and other elements that are chosen more for aesthetic purposes.
-
Your flowchart has just a few and simple steps. SmartArt charts lend themselves best to straightforward processes.
5 Flowchart Making Tips
Microsoft Word gives y'all two convenient ways to brand MS Word flowchart diagrams. To get the best results, proceed these tips in mind:
1. Plan It Out
Have a articulate vision for what you want your flowchart you expect like. Sketch it out with pen and newspaper and know exactly what text and images you're going to employ.
2. Brand the Design Elements Consistent
Apply a consequent style among the shapes and connectors in your flowchart. For example, use the aforementioned one or two fonts for the text.
iii. Fit the Entire Nautical chart on One Folio
For the greatest legibility, brand sure your chart fits all on one page. You may have to change the document'south orientation from portrait to landscape to accommodate a long or broad flowchart.
four. Don't Count on People Knowing What Flowchart Shapes Mean
As mentioned higher up, shapes have specific meanings when used in flowcharts. But your readers may not know what those are. Brand sure your flowchart makes sense even if this is the case. Information technology's besides a good thought to include a legend or symbol key to let your readers know what the various shapes correspond.
5. Follow the Conventional Reading Management
In the English language, readers read from left to right and top to bottom. If your flowchart is more than one level long, go along the second level on the left side of the page. (Of course, if your certificate is in a language that's read from right to left, lesser to tiptop, and so you'd follow that direction for your flowchart besides.)
Streamline Your Workflow With Microsoft Give-and-take Templates
Another fashion to streamline your workflow is with a Word template.
Templates may include a Microsoft Word flowchart or other diagrams. Even if that'due south not the case, starting with a Microsoft Word flowchart template is however an like shooting fish in a barrel mode to create a professionally-designed document.


With a template for Word, all the major design decisions have already been made for you by a professional. All you've got to practice is to customize it with your branding colors, images, and text.


I excellent source of Discussion templates is Envato Elements. In this artistic market place you'll find templates for various kinds of documents such as this resume/CV template, which includes infographics.


An Elements subscription gives y'all admission to much more than loftier-quality Word templates. For 1 low, fixed price per month, you get unlimited downloads of the creative components you need to make your certificate look its best, such every bit fonts, photos, graphics, and icons.
And if you create other types of materials, like videos and websites, then you lot'll also benefit from unlimited downloads of stock videos, music, audio effects, and presentation templates.
Create Your Ain Flowcharts in Microsoft Word
At present yous know how to make an easy flowchart in Microsoft Word. For complete control, build your flowchart with shapes and lines. For a fast and artistic look, use SmartArt. Either way, a well-constructed flowchart will make your document more effective at showing a procedure, workflow, or data menstruation.
You can also utilize Word templates to streamline your workflow. For the best quality and value, become Discussion templates and other creative resource from Envato Elements. Your subscription brings to your fingertips millions of artistic assets to help you communicate finer.

Source: https://business.tutsplus.com/tutorials/how-to-make-flowchart-word--cms-36498
Posted by: duncanboyaceing.blogspot.com
0 Response to "How To Draw A Flowchart In Word"
Post a Comment